
How to Connect Powerbeats Pro to Mac – Pair Quickly
If you are looking for a way to enjoy your favorite tunes on your Mac without the hassle of wires, you might want to consider getting a pair of Powerbeats Pro wireless headphones. These sleek and stylish earbuds offer high-quality sound, long battery life, and a comfortable fit. Plus, they are compatible with most Mac devices, including Macbook Air, Macbook Pro, iMac, and Mac Mini.
However, connecting Powerbeats Pro to your Mac might not be as straightforward as you think. Sometimes, you might encounter some connection problems or Bluetooth issues that prevent you from pairing your Powerbeats Pro with your Mac. Don’t worry, though.
In this article, we will show you how to fix these problems and how to connect Powerbeats Pro to Mac in a few easy steps. Let’s get started!
How to Fix Powerbeats Connection Problems with Mac Devices?
Before we dive into the step-by-step guide on how to connect Powerbeats Pro to Mac, let’s first address some common connection problems that you might face. Here are some possible reasons why your Powerbeats Pro might not connect to your Mac and how to solve them:
- Your Powerbeats Pro are not charged. This might seem obvious, but sometimes we forget to check the battery level of our devices. Make sure that your Powerbeats Pro have enough juice to pair with your Mac.
You can check the battery status of your Powerbeats Pro by opening the lid of the charging case and looking at the LED indicator. If it is red, it means that your Powerbeats Pro need to be charged. Plug the charging case into a power source using the Lightning cable and wait until the LED turns white. - Your Powerbeats Pro is not in pairing mode. If your Powerbeats Pro are already charged, but they still don’t show up on your Mac’s Bluetooth menu, it might be because they are not in pairing mode. To put your Powerbeats Pro in pairing mode, press and hold the system button inside the charging case until the LED flashes white. This means that your Powerbeats Pro are ready to pair with a new device.
- Your Mac’s Bluetooth is turned off or not working. Another reason why your Powerbeats Pro might not connect to your Mac is that your Mac’s Bluetooth is turned off or not functioning properly.
To check if your Mac’s Bluetooth is on, click on the Bluetooth icon on the menu bar. If it is grayed out, it means that your Bluetooth is off. Click on it and select “Turn Bluetooth On”. If it is already on, but you still can’t see your Powerbeats Pro on the list of available devices, you might need to troubleshoot your Mac’s Bluetooth.
To do this, click on the Apple logo on the menu bar and select “System Preferences”. Then, click on “Bluetooth” and make sure that the box next to “Show Bluetooth in menu bar” is checked. Next, click on the “Advanced” button and make sure that the boxes next to “Allow Bluetooth devices to wake this computer” and “Require pairing for security” are checked. Finally, click on the “Reset the Bluetooth module” button and confirm your action. This will reset your Mac’s Bluetooth settings and hopefully fix any issues. - Your Powerbeats Pro are already paired with another device. If you have previously paired your Powerbeats Pro with another device, such as your iPhone or iPad, they might automatically connect to that device instead of your Mac.
To prevent this from happening, you need to disconnect your Powerbeats Pro from the other device before pairing them with your Mac.
To do this, go to the Bluetooth settings of the other device and tap on the “i” icon next to your Powerbeats Pro. Then, tap on “Forget This Device” and confirm your action.
This will remove your Powerbeats Pro from the other device’s Bluetooth list and make them available for pairing with your Mac.
A Step-by-Step Guide to Connect Powerbeats Pro Wireless to Your Mac
Now that we have covered some common connection problems and how to fix them, let’s move on to the actual steps on how to connect Powerbeats Pro to Mac. Here is what you need to do:
- Make sure that your Powerbeats Pro are charged and in pairing mode. You can do this by following the instructions in the previous section.
- Make sure that your Mac’s Bluetooth is turned on and working. You can do this by following the instructions in the previous section.
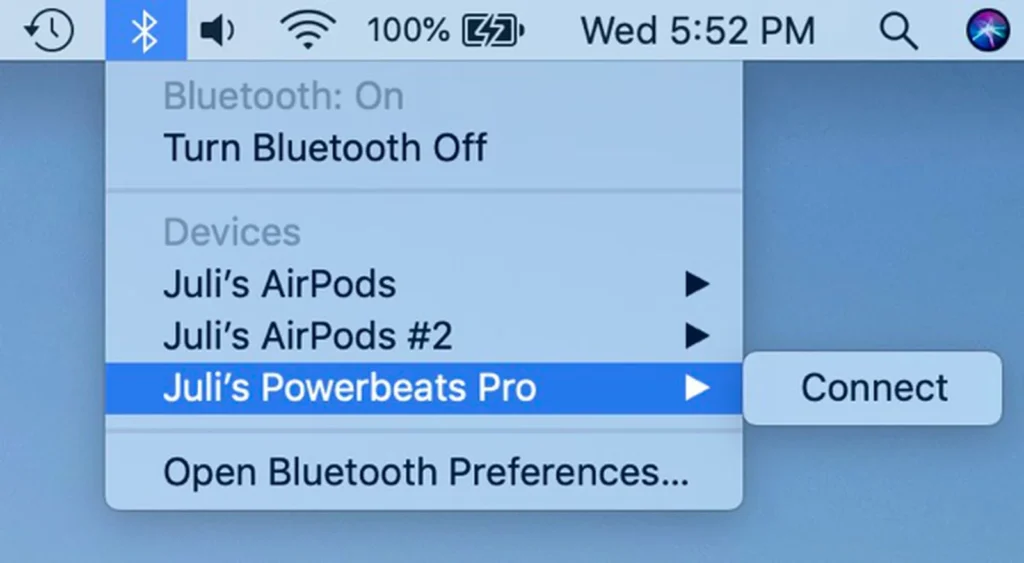
- On your Mac, click on the Bluetooth icon on the menu bar and select “Open Bluetooth Preferences”.
- On the Bluetooth preferences window, you should see your Powerbeats Pro under the “Devices” section. If you don’t see them, click on the “Search” button and wait for a few seconds until they appear.
- Click on your Powerbeats Pro and then click on the “Connect” button. You should hear a sound from your Powerbeats Pro confirming that they are connected to your Mac.
- Congratulations! You have successfully connected your Powerbeats Pro to your Mac. You can now enjoy your music, podcasts, videos, or whatever you want to listen to on your Mac wirelessly.
How to Pair Powerbeats with Macbook Air in Minutes
If you have a Macbook Air, the process of pairing your Powerbeats Pro with it is almost identical to the one we just described for any Mac device. The only difference is that you might need to use a different port to charge your Powerbeats Pro. Since the Macbook Air only has USB-C ports, you might need to use an adapter to connect your Lightning cable to your Macbook Air. Alternatively, you can use a wireless charger or a power bank to charge your Powerbeats Pro without using your Macbook Air.
Other than that, the steps on how to pair Powerbeats with Macbook Air are the same as the ones we outlined above. Just follow them and you will be able to connect your Powerbeats Pro to your Macbook Air in minutes.
The Easiest Way to Connect Beats to a Macbook without Wires
As you can see, connecting your Powerbeats Pro to your Macbook is not that hard once you know what to do. However, there is an even easier way to connect your Beats to your Macbook without wires. This method works for any Beats wireless headphones, not just the Powerbeats Pro. Here is how it works:
- If you have an iPhone, iPad, or iPod touch that is signed in to the same Apple ID as your Macbook, you can use the iCloud feature to automatically sync your Beats headphones with your Macbook.
This means that you don’t need to manually pair your Beats headphones with your Macbook every time you want to use them. Instead, they will automatically connect to your Macbook whenever they are in range and turned on.
To enable this feature, you need to make sure that both your iOS device and your Macbook have Bluetooth and Wi-Fi turned on and are connected to the same Wi-Fi network. You also need to make sure that both devices have the latest software updates installed. Then, you need to pair your Beats headphones with your iOS device using the instructions that came with your headphones. Once you do that, your Beats headphones will automatically appear on your Macbook’s Bluetooth menu and you can connect to them with one click. - If you don’t have an iOS device, you can still use the iCloud feature to sync your Beats headphones with your Macbook, but you will need to pair them with your Macbook first. To do this, you need to follow the same steps as the ones we described above for connecting Powerbeats Pro to Mac. Once you pair your Beats headphones with your Macbook, they will automatically sync with your iCloud account and you will be able to use them with any other Mac device that is signed in to the same Apple ID. This way, you don’t need to pair your Beats headphones with each Mac device separately. You can just switch between them seamlessly.
What to Do When Your Mac Bluetooth Headphones Won’t Connect
Sometimes, even after following the steps on how to connect Powerbeats Pro to Mac, you might still face some issues with your Mac Bluetooth headphones. For example, your Powerbeats Pro might not connect to your Mac, or they might connect but the sound quality is poor, or they might disconnect randomly.
These common Bluetooth problems can affect any wireless headphones, not just the Powerbeats Pro. Here are some possible solutions that you can try to fix these issues:
- Restart your devices. This is the simplest and most effective solution for most Bluetooth problems. Sometimes, a simple reboot can clear any glitches or bugs that might interfere with your Bluetooth connection. To restart your Powerbeats Pro, put them back in the charging case and close the lid. Then, open the lid and press and hold the system button for 15 seconds until the LED flashes red and white. This will reset your Powerbeats Pro and make them ready for pairing again. To restart your Mac, click on the Apple logo on the menu bar and select “Restart”. Wait for your Mac to reboot and then try to connect your Powerbeats Pro again.
- Update your software. Another possible cause of Bluetooth problems is outdated software. If your Powerbeats Pro or your Mac are running on an old version of the firmware or the operating system, they might not be compatible with each other or with the latest Bluetooth standards. To update your Powerbeats Pro, you need to connect them to a power source and a Wi-Fi network. Then, you need to open the Beats app on your iOS device
- and check for any updates. If there are any, follow the instructions to install them. To update your Mac, click on the Apple logo on the menu bar and select “About This Mac”. Then, click on the “Software Update” button and check for any updates. If there are any, follow the instructions to install them.
- Forget and reconnect your devices. Sometimes, your Bluetooth connection might get corrupted or outdated and cause problems with your devices. To fix this, you need to forget your Powerbeats Pro from your Mac and reconnect them again. To do this, go to the Bluetooth preferences window on your Mac and click on the “X” icon next to your Powerbeats Pro. Then, confirm that you want to remove them from your Mac. Next, put your Powerbeats Pro in pairing mode and follow the steps on how to connect Powerbeats Pro to Mac that we described above.
- Contact Apple support. If none of the above solutions work, you might have a hardware issue with your Powerbeats Pro or your Mac. In that case, you should contact Apple support and ask for their help. You can find the contact details of Apple support on their website or on the Beats app on your iOS device. They will be able to diagnose the problem and offer you a solution or a replacement if needed.
How to Solve Bluetooth Issues with Powerbeats on Mac
If you have followed the steps on how to connect Powerbeats Pro to Mac, but you still experience some Bluetooth issues, such as poor sound quality, audio lag, or interference, here are some tips that you can try to improve your Bluetooth performance:
Keep your devices close to each other
The optimal range for Bluetooth devices is about 10 meters or 33 feet. If your Powerbeats Pro and your Mac are too far apart, or if there are walls, furniture, or other obstacles between them, the Bluetooth signal might get weaker or interrupted.
To avoid this, try to keep your devices within the optimal range and in a clear line of sight.
Avoid sources of interference
Other wireless devices, such as Wi-Fi routers, microwaves, cordless phones, or other Bluetooth devices, might interfere with your Bluetooth connection and cause noise or distortion.
To avoid this, try to reduce the number of wireless devices around you or change their location or frequency.
You can also try to switch to a different Wi-Fi channel or use a 5 GHz band instead of a 2.4 GHz band.
Adjust your audio settings
Sometimes, your audio settings might affect your Bluetooth performance. For example, if you have a high bitrate or a high sample rate, your Bluetooth connection might not be able to handle it and cause lag or stuttering.
To fix this, you can try to lower your audio settings on your Mac. To do this, go to the Apple logo on the menu bar and select “System Preferences”. Then, click on “Sound” and select the “Output” tab. Next, click on your Powerbeats Pro and then click on the “Options” button. Here, you can adjust the bitrate and the sample rate of your audio output.
Try to choose a lower value and see if it improves your Bluetooth performance.
How to Make Your Powerbeats Visible to Other Devices
If you want to use your Powerbeats Pro with other devices, such as your Android phone, your Windows PC, or your smart TV, you need to make sure that your Powerbeats Pro are visible to other devices.
To do this, you need to put your Powerbeats Pro in pairing mode, as we explained in the first section of this article. Then, you need to go to the Bluetooth settings of the other device and look for your Powerbeats Pro on the list of available devices. Once you find them, tap on them and follow the instructions to pair them with the other device.
Note that you can only pair your Powerbeats Pro with one device at a time. If you want to switch to a different device, you need to disconnect your Powerbeats Pro from the current device and reconnect them to the new device. You can also use the Beats app on your iOS device to manage your Powerbeats Pro and switch between devices easily.
Compatibility of Beats and Macbook Pro: What You Need to Know
If you have a Macbook Pro, you might be wondering if your Powerbeats Pro are compatible with it. The answer is yes, they are. In fact, your Powerbeats Pro are compatible with any Mac device that has Bluetooth 4.0 or later. This includes the following models:
- Macbook Pro (Late 2013 or later)
- Macbook Air (Mid 2012 or later)
- Macbook (Early 2015 or later)
- iMac (Late 2012 or later)
- Mac Mini (Late 2012 or later)
- Mac Pro (Late 2013 or later)
If you have one of these models, you can use your Powerbeats Pro with your Macbook Pro without any problems. You can also use the iCloud feature to sync your Powerbeats Pro with your Macbook Pro and other Apple devices, as we explained in the previous sections.
However, if you have an older Mac model that does not have Bluetooth 4.0 or later, you might not be able to use your Powerbeats Pro with it. In that case, you might need to use a Bluetooth adapter or a dongle to connect your Powerbeats Pro to your Mac. You can find these devices online or at your local electronics store. Just make sure that they are compatible with your Mac and your Powerbeats Pro before you buy them.
FAQs
Here are some frequently asked questions and answers about how to connect Powerbeats Pro to Mac:
Q: How do I check the battery level of my Powerbeats Pro on my Mac?
A: You can check the battery level of your Powerbeats Pro on your Mac by clicking on the Bluetooth icon on the menu bar and hovering over your Powerbeats Pro. You will see a percentage next to your Powerbeats Pro indicating how much battery they have left.
You can also check the battery level of your Powerbeats Pro by opening the lid of the charging case and looking at the LED indicator. If it is white, it means that your Powerbeats Pro have more than 40% battery. If it is red, it means that they have less than 40% battery.
Q: How do I change the volume of my Powerbeats Pro on my Mac?
A: You can change the volume of your Powerbeats Pro on your Mac by using the volume buttons on your Mac keyboard or by clicking on the volume icon on the menu bar and dragging the slider.
You can also change the volume of your Powerbeats Pro by using the volume buttons on your Powerbeats Pro. Each earbud has a volume button that you can press to increase or decrease the volume.
You can also press and hold the volume button to mute or unmute the sound.
Q: How do I control the playback of my Powerbeats Pro on my Mac?
A: You can control the playback of your Powerbeats Pro on your Mac by using the playback buttons on your Mac keyboard or by clicking on the playback icon on the menu bar and selecting the option you want.
You can also control the playback of your Powerbeats Pro by using the multifunction button on your Powerbeats Pro. Each earbud has a multifunction button that you can press to play, pause, skip, or rewind the audio.
You can also press and hold the multifunction button to activate Siri or decline a phone call.
Q: How do I use Siri with my Powerbeats Pro on my Mac?
A: You can use Siri with your Powerbeats Pro on your Mac by pressing and holding the multifunction button on your Powerbeats Pro. This will activate Siri and you can speak your command or question.
You can also use Siri with your Powerbeats Pro on your Mac by saying “Hey Siri” if you have enabled this feature on your Mac.
To enable this feature, go to the Apple logo on the menu bar and select “System Preferences”. Then, click on “Siri” and check the box next to “Listen for ‘Hey Siri'”. You can also customize the voice and language of Siri on this window.
Final Thoughts
We hope that this article has helped you learn how to connect Powerbeats Pro to Mac and how to fix any connection problems or Bluetooth issues that you might encounter.
Powerbeats Pro are great wireless headphones that offer excellent sound quality, comfort, and durability. They are also compatible with most Mac devices and can sync with your iCloud account for a seamless experience. If you follow the steps and tips that we have shared in this article, you should be able to enjoy your Powerbeats Pro with your Mac without any problems.
If you have any questions or feedback about this article, feel free to leave a comment below. We would love to hear from you and help you out. Thank you for reading and happy listening! 🎧

